The year 2022 is shaping up to be a fantastic one for CSS with a lot of new features.
Today we will focus on one of those new features to come that will help us structure our code in a better way: the @layer at-rule, a new technique of cascade management.
The goal is to assist CSS authors in being more thoughtful about arranging the “layers” of CSS rules. To put it another way, this allows you to have more explicit control over your CSS files in order to avoid style-specificity issues.
This is very handy when dealing with huge codebases, design systems, and third-party styles in apps. Unexpected style overrides are avoided and better CSS architecture is promoted by layering your CSS in a straightforward manner.
We’ll see further in this article how it works.
Summary
What Is The Function of Cascade in CSS and How Does It Work?
First of all, let’s start with the fundamentals and see how the cascade works.
CSS employs the CSS Cascade algorithm to resolve competing declarations that wish to be applied to an element.
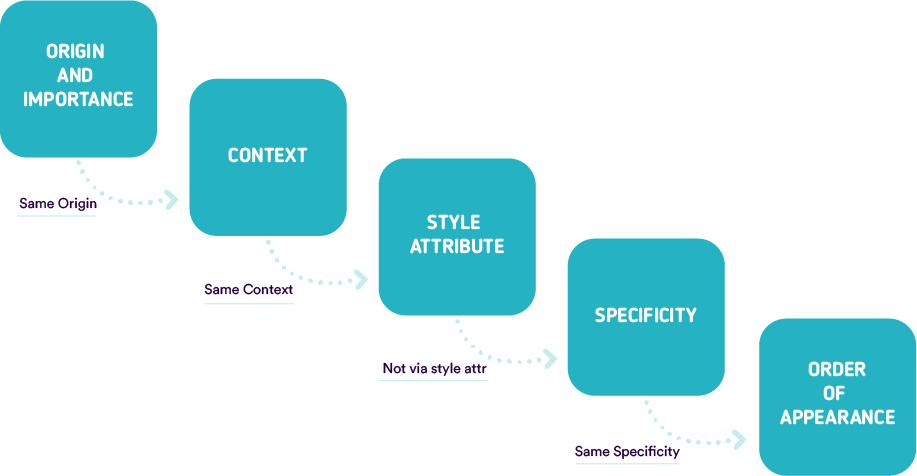
The cascade considers a few factors that are rated from high to low priority in order to determine which declaration should be used. They are checked one by one until a winning declaration is made. The cascade will go on to the next level if it is unclear which property declaration will “win” at a higher level.
What Is Cascade Order?
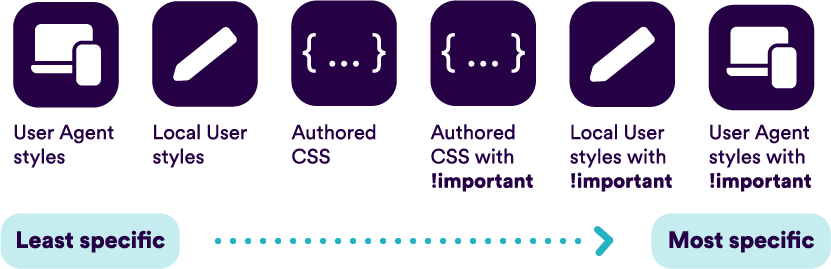
The CSS you create isn’t the only CSS that a page uses. The cascade takes the CSS’s origin into consideration. The browser’s internal stylesheet, styles introduced by browser extensions or the operating system, and your authored CSS all fall under this category.
See the order below:
Our place as web developers is obviously at the author stage. As a result, we must deal with selector specificity and appearance order as our means of controlling the cascade.
CSS Specificity and Conflict
You can apply style rules to any element by using different selectors available. Elements, for example, are less particular than classes or attributes, which are less specific than IDs.
That’s what we call specificity. You can see it as a score that determines which style declarations are ultimately applied to an element.
When two declarations for the same element focus on distinct attributes, the styles combine and the element shows properties from both declarations. In reality, when two affirmations don’t contradict one another, they merge.
But sometimes you can encounter some conflicts.
HTML is read from top to bottom and it goes the same way with CSS. When two separate styles are defined for an element, the declaration at the bottom always wins.
You can override it using the special CSS value !important but you should be very careful with its use. This keyword is used to give the most specificity to the property it applies to, thus overriding the normal cascade rules.
What Is BEM Naming?
To counter this, some web developers may use, for example, the BEM naming standard to avoid accidentally overriding specificity.
Basically, every “block” has a single class name in the HTML and follows the standard of Block – Element – Modifier.
BEM imposes a methodology that makes CSS authoring more rigid but also more secure. It’s quite easy to use the different classes produced in all pages without worrying about conflicts.
The code is then considered as an assembly of reusable, modular and extensible bricks. It is even possible to reuse certain bricks from one project to another without encountering conflicts.
It also communicates a component’s purpose or function, as well as a constant low-level of specificity for style selectors.
Where Do CSS Cascade Layers Fit in The Cascade Order and Why Is It Needed?
However, keeping such orderly styles isn’t always achievable, especially when dealing with third-party code and complex design systems.
Using !important, on the other hand, is a bad practice and should be avoided since it complicates debugging by disrupting your stylesheets natural cascading.
When two statements with the !important rule clash, the declaration with the highest specificity is applied to the same element.
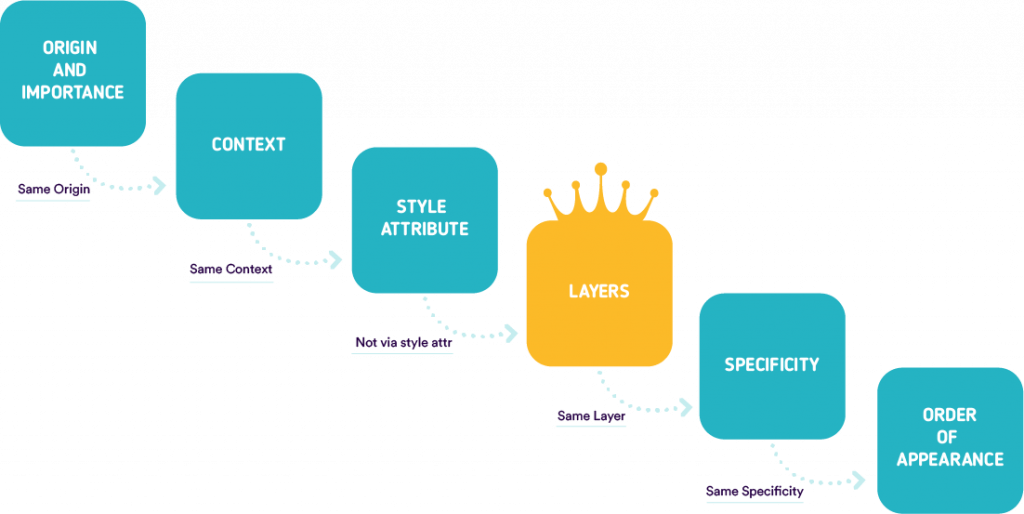
That’s why the cascade layers aim to solve this problem by introducing a new layer in the cascade, as you can see below:
What Are The CSS Cascade Layers and How To Implement It?
A cascade @layer can be created in 3 different ways.
The first way to specify it is by putting the CSS rules for that layer inside a @layer at-rule:
@layer base {
  /* some css rules */
}
You can also specify it with an import :
@import(base.css) layer(base);
And finally, you can create a named cascade layer without assigning any styles like this:
@layer base;
Nested layers
Layers can be grouped, nested and arranged as you wish. See example below:
@layer layer-1 {
  p { color: red; }
}
@layer layer-2 {
  p { color: yellow; }
}
@layer layer-3 {
  @layer sub-layer-1 {
    p { color: pink; }
  }
  @layer sub-layer-2 {
    p { color: green; }
  }
  /* un-nested */
  p { color: blue; }
}
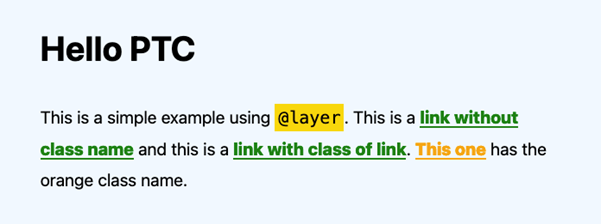
@layer explained with an example
From there, you have the ability to create several layers and arrange them in any way you desire:
@layer base {

  a {
    color: red; /* ignored */
  }


  .link {
    color: blue; /* ignored */
  }
}


@layer typography {
  a {
    color: green; /* styles all links */
  }
}


@layer utilities {
  .orange {
    color: orange;  /* styles all .orange */
  }
}
Let’s say that we have the the following layer stack at the top of your CSS file:
@layer base, typography, utilities;
It will make all the links appear green, except the .orange one which will be orange:
Let’s say now that you want to invert the order like this:
@layer base, typography, utilities;
As you may have guessed, all the links will be red and blue, as you can see in the screenshot below:
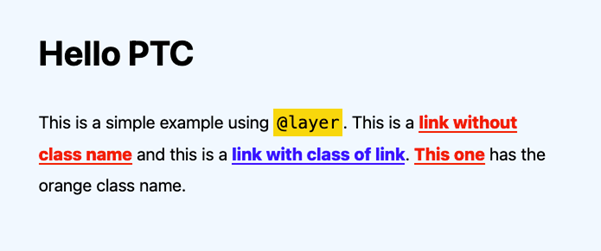
The layer precedence beats the element specificity.
A Very Simple Use Case
There is one simple use case for that: the CSS reset.
Some resets have previously done this by wrapping each selection in the :where() pseudo-class.
The functional pseudo-class :where() takes as argument a list of selectors and targets any element that can be selected by one of the selectors in the list.
The difference between :where() and :is() is that :where() will always have zero specificity while :is() takes the specificity of the most specific selector passed as argument.
Despite the fact that :where() eliminates all specificity from the selectors it is applied to, it has to be done for each selector separately. Inside the reset, conflicts must be addressed without specificity.
Using layers, we can encapsulate the full reset stylesheet more easily by using the @layer rule:
/* reset.css */
@layer reset {
  /* all reset styles in here */
}
Because layered styles have a lower priority than “un-layered” styles, this is an easy way to get started with cascade layers without having to rewrite your whole CSS codebase and without encapsulating each individual selector.
Should We Use CSS Cascade Layers?
It’s a bit early to use them because cascade layers are only supported in the most recent version of Firefox. In Chrome and Edge, they may be activated with a flag (with full support coming to Chrome in version 99).
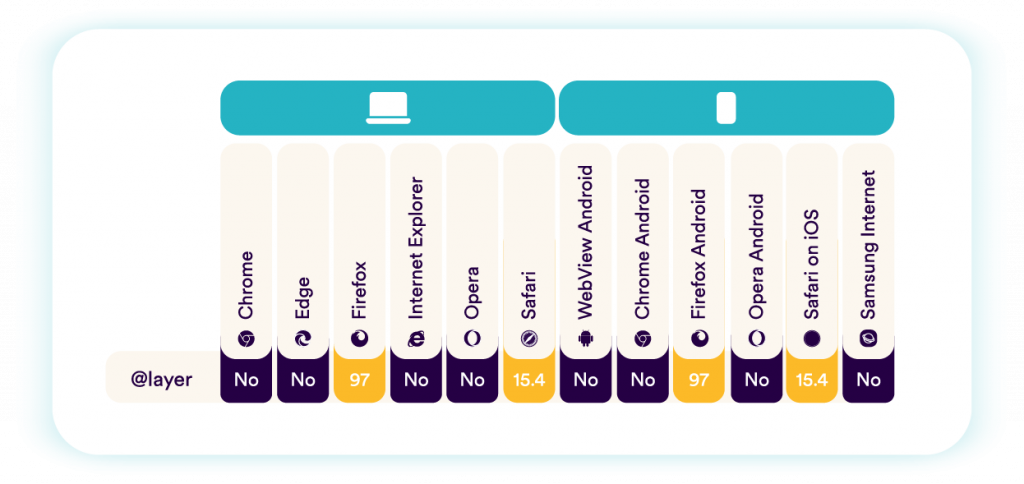
The only thing that you can do for now is playing with cascading layers to have a better understanding of how to use them.
In my opinion, it’s better to wait for a polyfill but we have no clue when that will be ready. All of the main browsers appear to be on board with this specification, so expect more broad support in the near future.
You still have some alternatives such as the :where() and the :is() pseudo-classes.
More Resources
To learn more about the CSS cascade layers, you can take a look at this:
- MDN Web Docs: @layer
- Cascade Layers Explained
- The Future of CSS: Cascade Layers
Read more Insights on Software Product Engineering.

Thanks to our
Author